Thursday, April 21, 2011

And she Turned 1!

Saturday was was daughter's 1st birthday! It was a pretty hectic morning with me trying to get everything ready with the cookies, decorations and food, but it was fun! Then the cake turned out wrong :( The place I ordered it from messed it up, it was supposed to have polka dots (but it had swirls) and it was not supposed to be cursive (but it was). Needless to say I wasn't happy about that, but hey you just got to go with it because not everything can be perfect!


It all started with the invitation:

Then she had to have the perfect outfit!


We decorated the house with ballons, streamers and fun stuff like that!

I found these cute polka dot balloons that went with her polka dot theme!

We opened presents, ate cake and she had a blast!


Sunday, April 17, 2011

Hoppy Easter!

Sorry I have been a little MIA the past few days, my daughter's 1st birthday party was yesterday, pictures will be coming soon! It was so much fun!

Easter is just around the corner and what would be cuter than a farm full of Chocolate Eggs?! I have a fun and cute project for you to tackle with your kids while they're at home bored during spring break! Do you have a bunch of those plastic Easter eggs just laying around? I know I did, that's what helped me come up with this idea!

What you will need: 

Plastic Easter Eggs
Chocolate you can melt (white chocolate works best)
Pretzels
Frosting
Jelly Beans
Wax Paper
 

Break the eggs in half if they are connected in the middle.
Lay them out with the open end laying on top of the pretzels (the pretzels will be the feet)
Once you melt the chocolate pour it on top of the eggs like this:
 
Let the chocolate dry a little so it will be a little tacky so when you place the decorations on them they will stick without sliding off.


Cut the ends of the jelly beans so that one side is flat
 
Keep both pieces of the jelly beans, you can use the little piece for a nose.
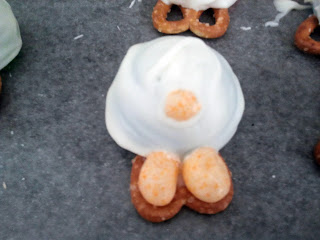
You can place two big pieces of jelly bean at the bottom for the chicks feet, and the little piece on the face for the beak,  like this:

If you would like you can place two large pieces of jelly bean on top of the egg for ears, and a little piece on the face for a nose:
I thought these looked cute!

Next you need to put on the eyes with frosting:
 
One of the pink ones actually made me think of a pig, so I also made one of them a pig!


Next decorate the animals like you would like, I added whiskers for the bunnies, a snout for the pig and a little piece of puff for the chicks!
 
Now let the chocolate finish drying


and..

Now you have your little Easter farm:
I added a little grass, a fence and an Easter basket for decorations!

Have fun!

*If you would like you can email pictures of your creations to: mndy.made@gmail.com and I will feature them on my blog for everyone to see!*


Wednesday, April 13, 2011

Can you do me a Favor!

Only 3 more days until my daughter's 1st birthday and I am super excited! I still have so much to do for her party, but I can't wait! If you are like me and have a party coming up, these will make the perfect party favor (and may even be the talk of the party, except of course your little birthday prince or princess). The best part about these is that you can make them into "moths" for a boy themed bug party, or "butterflies" for a princess theme girly party! I made these for my daughter's party and they are super easy to make and super cute! Your kids can even help too, if they don't eat all the candy first :)

To start off all you need is:
Candy (whatever goes best with your theme, I used Jelly Beans)
Clothespins
Ziploc bags
Pipe Cleaners
Glue
Decorations (Googly eyes, glitter, markers, paint, etc.)
Scissors


Now that you have all your supplies lets begin!
Start by filling you ziploc bag with candy, I put 34 pieces in mine.

Now split the candy in half and take a piece of the pipe cleaner and twist off in the middle of the bag to look like this:
*This will be your wings*

Now it's time to decorate the clothespin! This will be the body of the butterfly, so you can make it look however you would like it to! I gave mine eyes, and I used the pipe cleaners for antennae and I gave it a puff nose! Get Creative!

Now just place the center of the bag in the clip of the clothespin and you have your Butterfly Party favor!
After I looked at this picture I decided he needed a mouth! So I gave him one with blue glitter glue!

He didn't look to happy before, but now he is all smiles!

Have fun and enjoy!

Tuesday, April 12, 2011

Rain, Rain Go Away!

Yesterday was so nice outside! There was a cool breeze and the temperature was 80 degrees. Talk about wanting to be outside! Needless to say I woke up this morning to rain and I was a little disappointed. But hey, look on the bright side, it's a perfect day for rainy day crafts, and I have just the idea! Clothespin Letter magnets to stick to your fridge! They are simple to make and your kids will love them!

What you need:     Clothespins
                            Craft Paper
                            Mod Podge (or any craft glue will work)
                            Scissors
                            Decorations (Markers, pipe cleaners, googly eyes, buttons, etc.)
                            Magnets (the strips of sticky back ones work best)                          


Once you collect all your supplies decide what letters you will need. Cut them out of the card stock, I used a Cricut, but you can use stencils, print the outlines from your computer or just draw them out! For mine I used my daughter's name:
*If you are using markers to decorate the letters color  them now, it will be much easier to color them before they are glued onto the clothespin*

When you are done cutting them out, glue them on to the clothespins.Let them dry for about 5 minutes before applying the decorations.

When the letters are dry, let your kids decorate them how ever they want!

When they are finished decorating it is time to stick on the magnets! I cut the magnets up small enough to fit on the back of the clothespin.

Just peel the paper off the back of the magnet and stick to the back of the clothespin.
Now just let the clothespins dry for a few hours before sticking them.
Now you have beautiful magnets to hold your kids artwork up on the fridge!
Have fun, I know we did!!

Monday, April 11, 2011

Happy Spring: Here I Go!

I have been recently thrown into the crafting world, and I LOVE it! I have always loved being crafty and doing all types of DIY things, but I never really had the time. Since my 2nd daughter was born last April (yes, I know it's almost her 1st birthday and I am so excited!) I have dusted off my old sewing machine and quit my full time job to become a work at home mommy! As I have been getting more familiar with all the other wahms on here and facebook, I have noticed that every great crafter has a blog, so here I am in hopes to become a great crafter! I created this blog so that I can share with you a few of my many talents and ideas, and hopefully learn some new things and I can't wait to get started!