Pages

Monday, August 29, 2011

Crayons!

When I first started this blog, I thought that all I was ALLOWED to do was post tutorials and stuff just to get people to read it and follow me. I follow a few blogs, and they inspire me to keep doing what I do, and the other day I realized, this blog doesn't need to be all about tutorials, (I mean I know people love tutorials, I know I do!), but there has to be some other kind of interesting things going on too! I love to craft, and personally I have been doing it all of my life. When I was little I would skip right by the TOY aisle (I know, CRAZY, huh?) and head straight for the markers and crayons and art supplies. I loved cutting and glueing things, my mom wouldn't let me paint :( But oh, well, I got over that quickly! So the reason I started this blog was to share my craftiness with everyone, so I hope if you decide to follow me, that you will enjoy everything else along with it! (p.s- I am looking into getting a new camera soon, fingers crossed, so hopefully there will be better pictures for you to look at!)
So my point is... That I promise to make this an interesting blog full of craftiness, ideas and maybe some motherhood thrown in there!

                                                                   Source: Pinterest


Now to the good stuff :)

Okay, so I kind of have this obsession with crayons! I just LOVE them! And I really love this time of year, because it is when you can find them REALLY cheap! Like 25 cents cheap! So I kind of stock pile on them and use them throughout the year for different crafty projects that I can come up with. 
Well while my hubby was home I worked on this:
And it was soo funny, because he was just as excited about me making it as I was! Which amazed me :) He's always like, ANOTHER craft project? Don't you have enough of those? Hehe! But with this one he was right there with me watching me make it, (He even was trying to give me tips, ha!) I am very happy with how it turned out, with it being my first one and all! Needless to say there are going to be more in the future!

Saturday, August 27, 2011

Bunkering Down!

When Hurricane Irene first turned, she was aiming right for us.. Well, she gradually turned again, and only hit the coast. But before we were told it wasn't headed straight for us, everyone was getting prepared! Me, on the other hand (I kind of love to procrastinate), didn't get anything ready. But I also was raised on the east coast, on the beach, and I have been through these things before.
Source: Pinterest

                     Well needless to say, we just got ALOT of rain and WIND!
              Oh, and we are all fine! :)
               Little Keira and I just got to spend a lot of girly time together!
             By the way, it's supposed to be sunny and 95 tomorrow, yay....
           Have a good Sunday! :)

Friday, August 26, 2011

Fun Little Ruffle Clippies!

So.. My husband left again to go back to his deployment this week :( Major sad face. So it's back to blogging for me! 
It was a great two weeks, but it went by way to fast. We didn't do much but hang out and relax, which was fine with the both of us, since we haven't seen each other in a while. I was just glad to spend time with him :)
I'm not very good at taking pictures of us without taking off part of one of our heads :|..

I miss him so much :(

I did manage to work on a couple of crafty things while he was here though, I just can't stay away :D
I had some scraps left from the Halloween dresses that I made, so I decided to use them to make cute little clippies to match them and this is what I came up with:


What do you think? Would you like to make some of your own?
Well here's your chance!

What you will need is:
-Fabric (I used scraps)
-Glue Gun
-Hair Clips
-Ribbon (Optional)

First I measured the clip to see how long I needed to cut the strip of fabric.
For my clips I cut them 1in. by 4.5 in. for the outside ones and 3/4 in. by 4.5 in for the inside piece

I then ruffled them using the basting stitch on my sewing machine
They kind of curled up and I couldn't get them to stay uncurled for the picture :(
I took the outside threads and tied them in knots once I got the fabric ruffled like I wanted to keep it in place.

I decided to line the clips at the last moment, because I thought it would look cleaner
I need a better camera... These are actually Orange!

I curled under the ends of the fabric and then hot glued the clip
and tada! There you have it.. Cute, little Ruffle Clippies!


Have an awesome Weekend!!!

***In case you would like to buy these little clippies instead of making them, they will be available in my Etsy store this weekend!***

Saturday, August 20, 2011

Winner, Winner!

So.. My exciting news was that my husband came home for his r&r, Yay!!!!! I was so excited, he kind of surprised me, because I wasn't expecting it to happen for a few more months. We have had so much fun since he has been back, I don't want him to leave again :(
Well while he has been back....
My computer broke :(  
Sorry guys, I just got my computer back.. But it's all better now :)

I love my Mac and I didn't think that I could live without it! Well it broke last week and I had to find somewhere to fix and I just got it back... I thought I was going to die without it, I felt sooo lost, hehe. The hard drive died on it, I guess I put it through too much with all my pictures and stuff (I take ALOT of pictures).

I know you guys have been sitting on the edge of your seats waiting on the winner though :) 
Although I only had 2 entries for it, oh well better for the 2 that entered, huh?!

And...
The Winner is..
Amanda!!!!
(Hey, we have the same name, hehe!!)

If you would email me at mndy.made@gmail.com with your info!
(Don't worry if you didn't win or get a chance to enter there will be more giveaways in the future!)


Don't worry! Now that I have my computer back I will be back to posting!!

Halloween is coming up, and I can't wait! So be on the look out for a bunch of spooky tutorials! Halloween is my favorite holiday, I look forward to it every year! 

I have even made a few dresses for my little Etsy store..

I ordered this Riley Blake fabric and I couldn't wait to get started on something with it!!!!!

Aren't they adorable :)
I know, I know, I'm a little biased...

Well i'm off to spend some more time with my husband... Have a great weekend!!

Tuesday, August 9, 2011

Even More Ruffles!

So I am almost done with my Bottled Rainbow square for this week! I'm excited to show you guys! I give it to you quilters out there.. It's alot harder than it looks (at least to me)..


I found a couple of old shirts of Keira's the other day that had a few stains on them.. (eww)!!!
I couldn't get the stains out, so I decided to cover them up.. Hehehe!
And this is what I came up with:

What do you think??

Would you like to make your own?

Well now's your chance!
Go find some of your kid's old shirts (I know you have some! Everyone does!)
You can even use some fabric scraps for this!


I cut the strips for the ruffles 2.5 inches x 9 inches

I serged all 4 edges of the strips (if you don't have a serger you can use a zig zag stitch)
The use your sewing machine to make the ruffles
and place them on your shirt like you would like them to make sure they look right before you sew!

Start with the bottom ruffle and pin it on
(Haha, you see the stains in this picture??)
Sew this ruffle on, make sure to back stitch at the beginning and end to make sure it stays
Continue to do this with your other ruffles until you are done


And there you have it! Your "new" ruffle tee!!

*By the way, Don't forget about my giveaway in the post below!!!*


Linking up with Get your Craft On!

My First GiveAway!

Today I am going to do my first Giveaway! Yay!

I am getting ready to celebrate something, which I will tell you about later! I am getting very excited, because it is coming up soon!
Anyways, I have been working very hard, creating new things for my Etsy shop. I'm trying to get it up and running. I have added a few things as I go, so be sure to check it out! There are cute skirts, dresses and even shirts handmade by yours truly!

I began teaching myself how to sew about a year ago, and I am beginning to try new things like quilting! Bottled Rainbows is my first quilting venture as I told you in an earlier post. I finally received my walking foot for my sewing machine today! Yay! (remember last week, I forgot to order one before I received all my stuff, oops!) I've been working on my first square, and I am now almost done with it! I can't wait to show it off when I am finished!

So now on to what you have been waiting for...

The Giveaway!

I am going to give away my "All you need is love" Onesie in your choice of size from 0-3m through 24 months!


To qualify for this giveaway you must:
1. Follow mndy.made (1 entry)
and
2. Like mndy.made on facebook (1 entry)

Yep, you're right.. That's 2 entries, so you have 2 chances to win! Yay!
Just comment below with each thing you did!

So go ahead, spread the word!
*you have until Friday August 12th at 6pm EST*

Saturday, August 6, 2011

Look what I made!

So this week I got a new toy to play with! I got a Go! Baby fabric cutter by Accuquilt! I was so excited about it, I got started right away. Within an hour I had already made this:
 
I bought the tumbler die along with my cutter, because I saw a post by Ashley over at Make it and Love it. Now I am just waiting on the walking foot for my sewing machine (remember from this post?) so that I can finish it!

A few weeks back I found this awesome tutorial on ruffles on a blog, but now I can't seem to find it. I hate when that happens :\
Anyways, since I couldn't find I it, I have made my own for you!
Are ya ready?

First you can take the strips of fabric that you are going to be ruffling and serge around the edges


Then on your sewing machine, you set the stitch length at the longest setting, and your tension to 9 (or the tightest tension on your machine)


For these ruffles I sewed down the middle, because that is where I wanted my ruffles at. But you can do this part at the top if that is how you want your ruffles.
I went down the center twice with this stitch, when you do that it seems to make the ruffles more evenly.
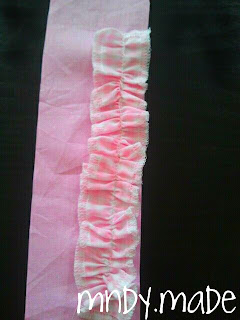
 When you sew down the length of the fabric with these settings on your sewing machine it will automatically ruffle your fabric like so.
And there you have your ruffles!

Have an awesome weekend everyone!

Thursday, August 4, 2011

Slap Bracelets!

Uhhhh, so I forgot one MAJOR thing that I needed for making the quilt.. The walking foot for my sewing machine :(
I started it and everything. I started with the Petal block (because I have a thing for PINK), I got the block all together down to the scrap pieces in the middle. I went to sew the scrap pieces in the middle of the block, and duh! I forgot that I kind of needed to buy the walking foot, hehe. (Leave it up to me!)
I feel like such a blonde now.
Last week we went to Chuck E. Cheese here for pizza. We won some tickets so we went to the prize counter, and guess what they had... SLAP BRACELETS! Ha. Remember those? Those tacky bracelets we used to slap on each others wrists? Yep.
They were so tacky looking, haha. I had to figure a way to glamor them up, so maybe... just maybe I could wear one!
Well it finally hit me when I was designing this weeks blogs full of RUFFLES! (I just love ruffles!)
Anyways.. Would you like to see what I came up with??
(I know the suspense is killing you!)
Well.... TaDa!
 
(I know the picture is HORRIBLE, I so totally need a new camera)


What do you think? You like? It's even interchangable.. You can make more than one and just change the cover on it depending on your mood... I guess like a mood bracelet, hehe!

So here's what you've been waiting for, the tutorial!
The materials you will need are:

Scissors
Fabrics, you can even use your scraps for this (yay!)
Slap Bracelet
Elastic
and your handy, dandy Sewing Machine!
 Measure out the width and the length of your bracelet. My bracelet was 1in. x 9in., so I cut my fabric 3in. x 10in. 
Then I cut a notch out of the top corner that is about an inch by an inch and a half, for the flap.


I serged the top part and added velcro so that way the bracelet can be interchangable.


It's ruffle time! I used a scrap that was an inch by 15 inches.
Once you have the ruffle how you want it pin it to the long half of the main fabric.


And sew it on!


Fold the piece in half, long ways.. 
(Remember folding the paper Hot Dog style in school?? I do! and this totally reminded me about that)


Make sure to keep the ruffles off the edge so you don't sew them! Now sew up along the side and across the bottom part. And turn it right side out... and
Walah! 
You now have your slap bracelet cover!


*So who's watching Project Runway right now??? I know I am :)*


Tuesday, August 2, 2011

Ruffles, Ruffles, Ruffles!

This week I wanted to focus on a little something I like to call Ruffles! I just love ruffles, they add that "Girly" feel to just about anything! They are perfect for touching up that simple old onesie! I'm sure you have a couple of onesies just lying around, waiting to be jazzed up some, I know I do! Or even an old t-shirt will work to (for the older girls).
 Would you like to make your own Ruffle Onesie?
Well first I went on that search for that onesie that I could jazz up a little, with a scrap of fabric and about 15 minutes (if that). Of course I easily found one:
  I measured my scrap piece of fabric, for this onesie (size 0-3m) a piece 2in. by 7in. worked perfect. Of course for bigger sizes you would have to make it wider, so adjust accordingly to the size shirt you are working one.
 I then serged all 4 edges of the fabric, then on the bottom side I folded it up a quarter of an inch to give it a clean look.

 Ruffle time! I created my ruffle using my sewing machine set on the longest stitch, tutorial coming soon!
 I pinned the ruffle onto the collar of the shirt where I wanted it to be

 I then sewed the ruffle on to my shirt, making sure to backstitch at the beginning and the end to make sure it stays put.
 And there you have it, a simple, quick way to jazz up to your boring, old onesies!

I just LOVE ruffles!